


Welcome - I hope you enjoy viewing my work. I modify most of my figure kits so that they wind up quite different from the original. (And there is a lot more here than just dinosaurs - so browse on!) I re-discovered the joy of art in mid-life and its been a joy to create and share my vision with others. Art, like all creative gifts, exists to be shared so as to enrich the lives of others.
So this website is my gift to you. If you have an interest in art/sculpting/modeling of all kinds of subjects, I would recommend that you check out the Internet Figure Modeling Clubhouse at
INTERNET CLUBHOUSE and also see
At both sites you will find incredible artists and sculptors, some nationally known. Their work will leave you in awe.
Thank you for stopping by!
NAVIGATION INSTRUCTIONS: THE GALLERY PAGE LINKS ARE THE SMALL NUMBERS ON THE LEFT, JUST ABOVE THE INDEX PHOTOS. TO ENLARGE PHOTOS, CLICK ON THE THUMBNAIL, THEN CLICK ON THE ENLARGED PHOTO IN THE LOWER RIGHT-HAND CORNER OF THIS PAGE AND FOLLOW THE DIRECTIONS.
FYI: SOME THUMBNAILS MAY APPEAR DISTORTED - IF YOU CLICK ON THE "VIEW FULL SIZE IMAGE" TEXT ON LOWER R OF THE PHOTO IT WILL OPEN UP CORRECTLY.
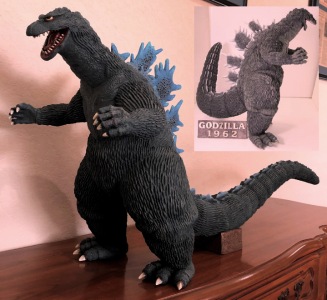
So, I straightened out the tail by making cuts in between the round sections, bridging the gaps with wire and then Quickplastic putty; the same method was used to spread the arms wider by making cuts on the inside of the elbows and then pulling the arms apart; finally I used a razor to slice off the top of Godzilla's jaw/face in front of the eyes and re-sculpted it with Quickplastic putty. I also re-shaped and bulked-up the lower jaw and neck areas. The original face (see inset photo) was a little squashed looking.
Here is a useful tip when making larger vinyl models (I first used this technique on my Darga Trex & Triceratops models):
Use wires to hold each of the parts of the kit together. For example, I drilled small holes and inserted 4 wires between the tail and body - bending them through the opening in the body, and then securing them - inside and out - with Quickplastic putty (which eliminated all trace of the wires on the outside of the body.)
On the legs, I kept the flashings, and used the same technique to bind the legs together in the middle (through the opening in the body, and also secured each leg on the side with a wire running through the side of the body. I also filled the legs with plaster which made the model a lot more stable and gave it enough weight not to tip backwards onto the tail.
Finally, I 'popped' the upper body on top of the larger bottom half, and used 4 wires - two in between the fins and one each on the side under the arms - between the upper and lower halves of the body.
This was trickier as I no longer had a body opening to reach through so that I could bend them on the inside, but by bending them ahead of time, and bending the vinyl during the insertion I achieved pretty much the same thing. Then I molded Quickplastic putty over them, and *voila*!
The upshot is that I can now pick up this kit by the tail, or each one of the legs, shake it, and it holds steady as a rock. If you just glue and putty kits of this size, you're asking for trouble should you ever drop it or have a similar jarring accident.
I just pass this tip along for what its worth. Its a lot simpler than building an internal armature, and just as effective in giving your large vinyl model much greater body integrity.